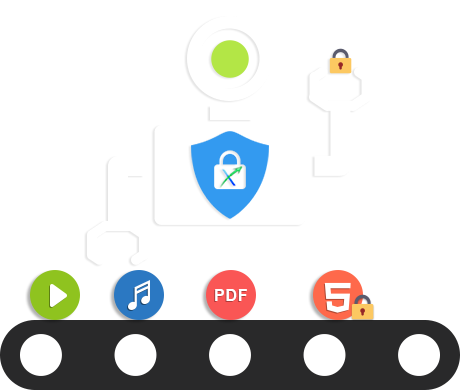
DRM-X 4.0 Automatic Batch Encryption Tool secures MP4, WebM, MP3, PDF, HTML, HTM, BMP, GIF, PNG, JPG, JPEG, WebP, SVG, JS, and CSS files. Key features: manually encrypt specific files/courses, auto-scan directories for batch encryption, and convert PDF to encrypted HTML (security + cross-platform adaptability), empowering enterprises with automated digital asset security and cross-platform compatibility.
Available for Windows 10+ / macOS 13+ (Apple Silicon & Intel)
Customers need to subscribe to DRM-X 4.0 Premier account or above to use this tool normally.
Manual batch encryption: Customers can select individual courses for encryption operations in a targeted manner according to their own needs, and flexibly control the objects and timing of encryption.
Automatic scanning encryption: By setting a specific scanning directory, the tool can automatically identify files in the directory that meet the encryption conditions and encrypt them, greatly improving encryption efficiency and reducing manual intervention.
Convert PDF to HTML encryption: This function can convert PDF files into HTML format and encrypt them simultaneously, meeting customers' needs for file format conversion and encryption in different scenarios, and providing an additional solution for file security and format adaptation.
DRM-X 4.0 Authentication
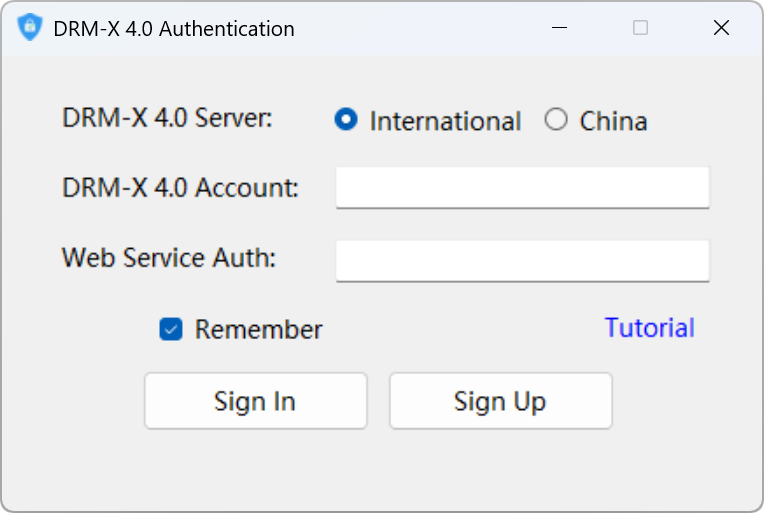
After running the DRM-X 4.0 Auto-Encryption tool, you need to select the server to which your DRM-X 4.0 account belongs, and then enter the "DRM-X 4.0 Account" and "Web Service Verification Code". Click the [Login] button to complete the identity verification.
If you have not set up a "Web Service Verification Code", please visit through your browser: https://4.drm-x.com/SetIntegration.aspx Set the "Web Service Authentication String for DRM-X web service" to ensure that the various functions of the DRM-X 4.0 encryption tool can be used normally in the future.
1. Manual encryption instructions
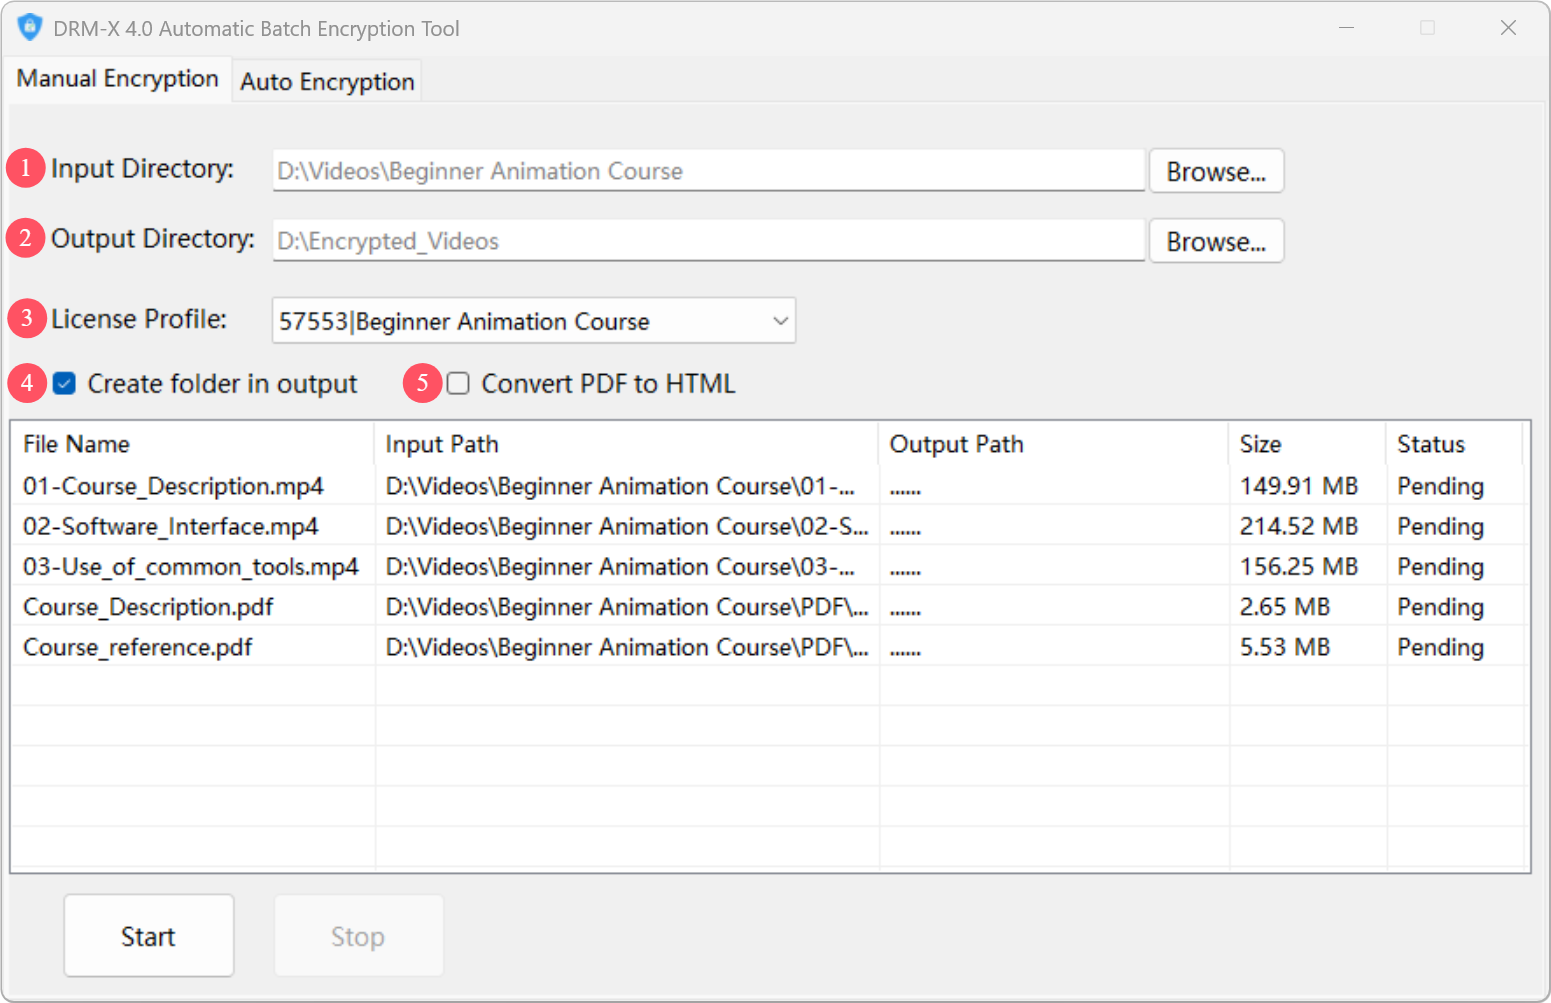
Alert: Before using the "Manual Encryption" function, you need to manually create a "License Profile" in the DRM-X 4.0 Admin Panel in advance, otherwise the encryption process cannot be completed smoothly.
① Input Directory (required)
This directory specifies the folder path where the files you want to encrypt are located. All files in this folder and its subfolders will be included in the encryption scope.
For example, if you specify the folder [D:\Videos\Beginner Animation Course], and the folder contains multiple video files and a [PDF] subfolder, then all the videos and files in the subfolders will be encrypted using the same License Profile.
The structure of the input directory:
Beginner Animation Course
└─ 01-Course_Description.mp4
└─ 02-Software_interface.mp4
└─ 03-Use_of_common_tools.mp4
└─ Course_Description.pdf
└─ Course_Reference.pdf
② Output Directory (required)
This directory is used to specify the storage location of the encrypted files. After the encryption process is completed, all encrypted files will be output to this directory folder.
For example, if you set the output directory to [D:\Encrypted_Videos], the following is the complete output directory structure after batch encryption:
Encrypted_Videos
└─ 01-Course_Description_P.mp4
└─ 02-Software_interface_P.mp4
└─ 03-Use_of_common_tools_P.mp4
└─ Course_Description_P.pdf
└─ Course_Reference_P.pdf
③ Select a License Profile
This option is used to specify the License Profile used for the encrypted file. You need to create a License Profile for the course in the DRM-X 4.0 Admin Panel in advance.
④ Create folder in output directory (optional)
If this option is checked, the program will automatically read the folder name of the input directory and create a folder with the same name in the output directory. For example, if the input directory is [D:\Videos\Advanced Courses] and the output directory is [D:\Encrypted_Videos], after this option is turned on, the final encrypted file will be stored in the [D:\Encrypted_Videos\Advanced Courses] folder.
⑤ Convert PDF to HTML (optional)
When you check this option, the program will convert the PDF file to HTML format when reading it, and then encrypt the original PDF file and the converted HTML file together to meet the needs of file format and encryption in different scenarios.
Other Features
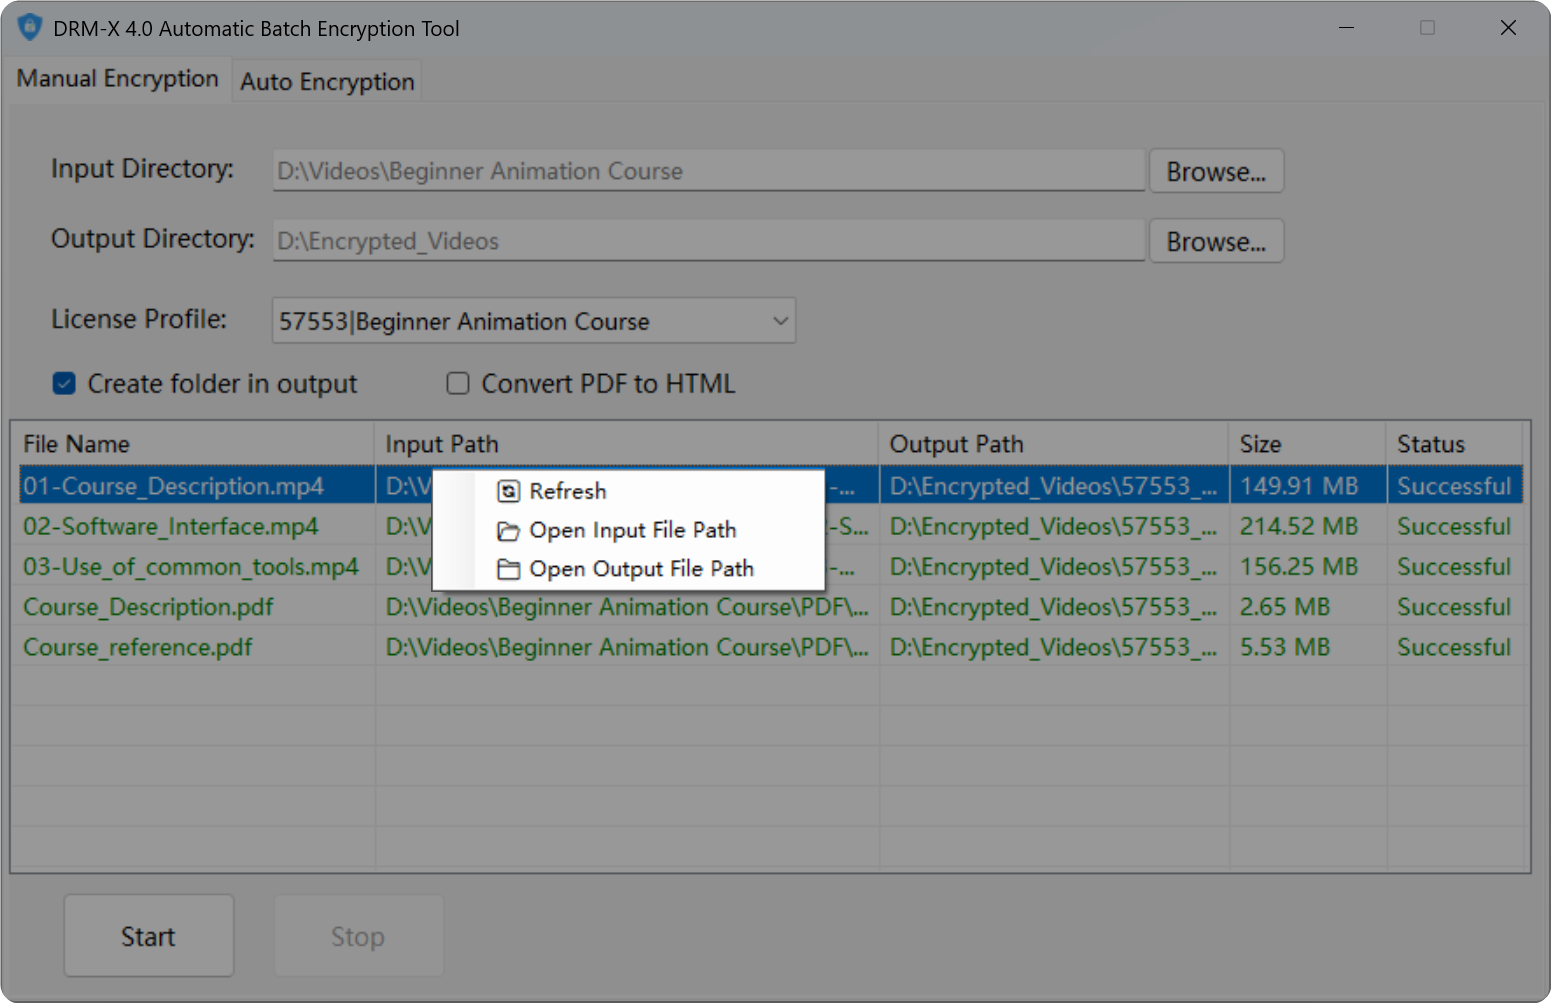
The file list in the manual encryption interface supports right-click menus, and the functions include:
- Double-click to open the input file: Double-click in the file list to open the source file of the current file.
- Refresh the list: Refresh the current input directory and reload the files into the file list.
- Open the input files directory: Open the directory where the source file is located.
- Open the output file directory:Open the directory where the encrypted file is located.
2. Automatic scanning and encryption operation instructions
Basic setup and startup
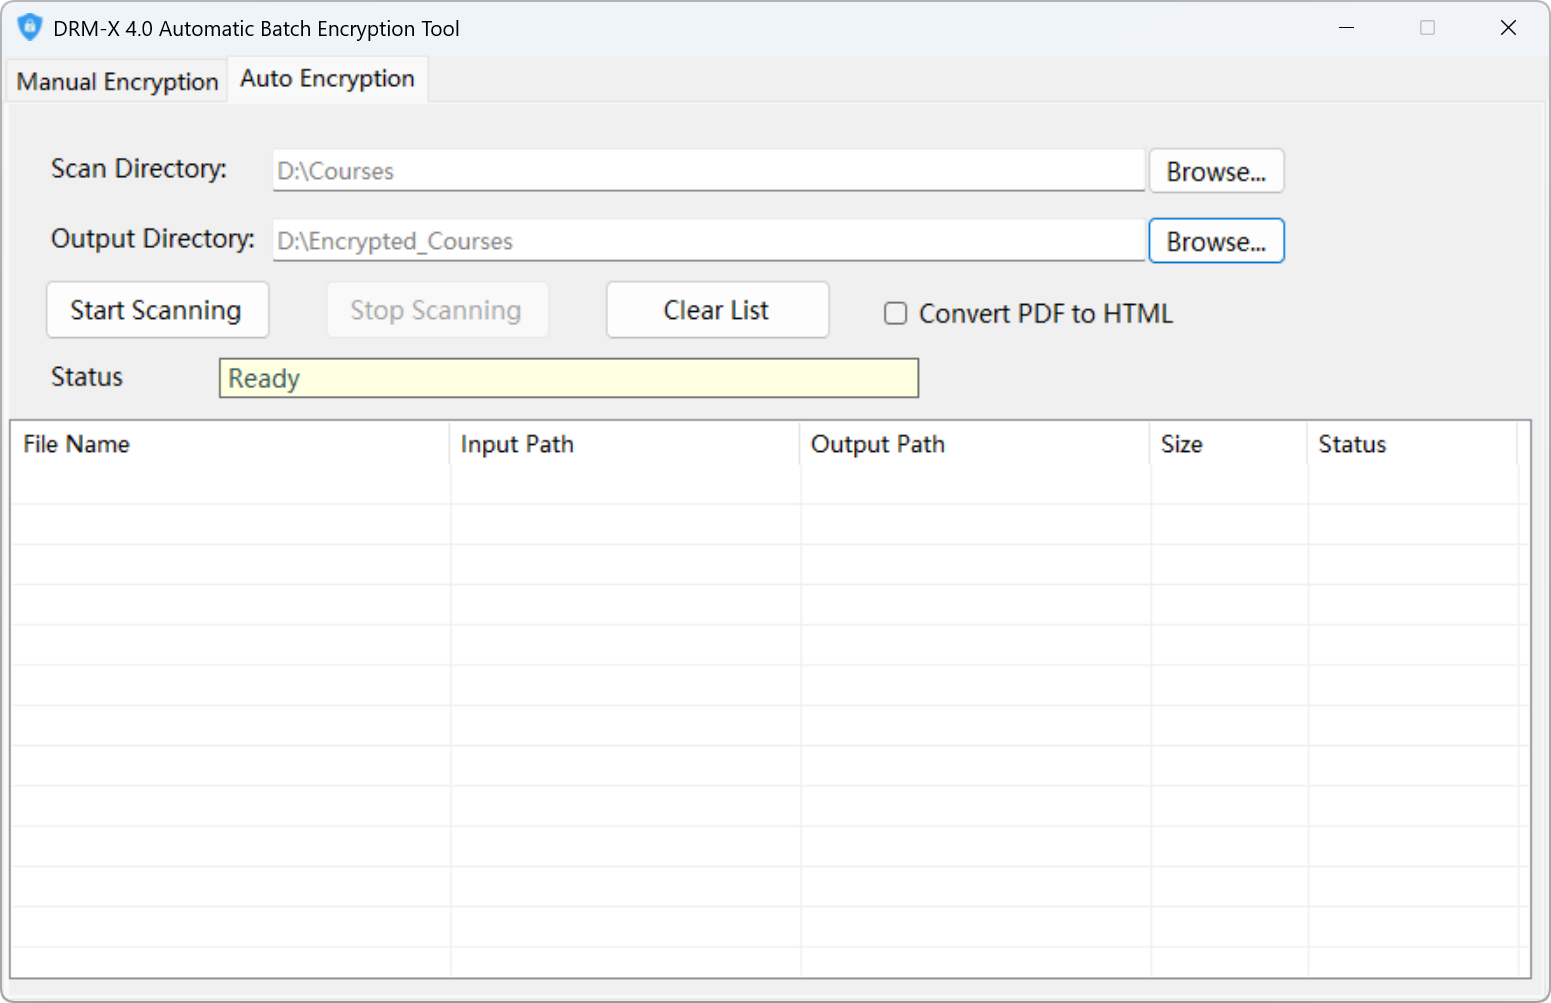
In the [Auto Encryption] interface, you need to accurately set the [Scan Directory] and [Output Directory].
[Scan Directory] specifies the starting path for the program to automatically scan folders. All first-level subfolders (course folders) and subdirectories at all levels under this path will be included in the scan range;
⚠️Note: The scan directory is the directory where the course folders are placed, not the course directory. For example: if the [Scan Directory] is D:\Courses, then the course folder must be placed in the Courses folder.
[Output Directory] is used to determine the storage location of the encrypted files.
[Select Rights] Sets the default License Rights for automatically created License Profiles.
After completing the above two key settings, click the [Start Scanning] button and the automatic scanning and encryption process will start. At this time, the program will deeply scan the directory you set and all its subdirectories according to the established rules.
File list function
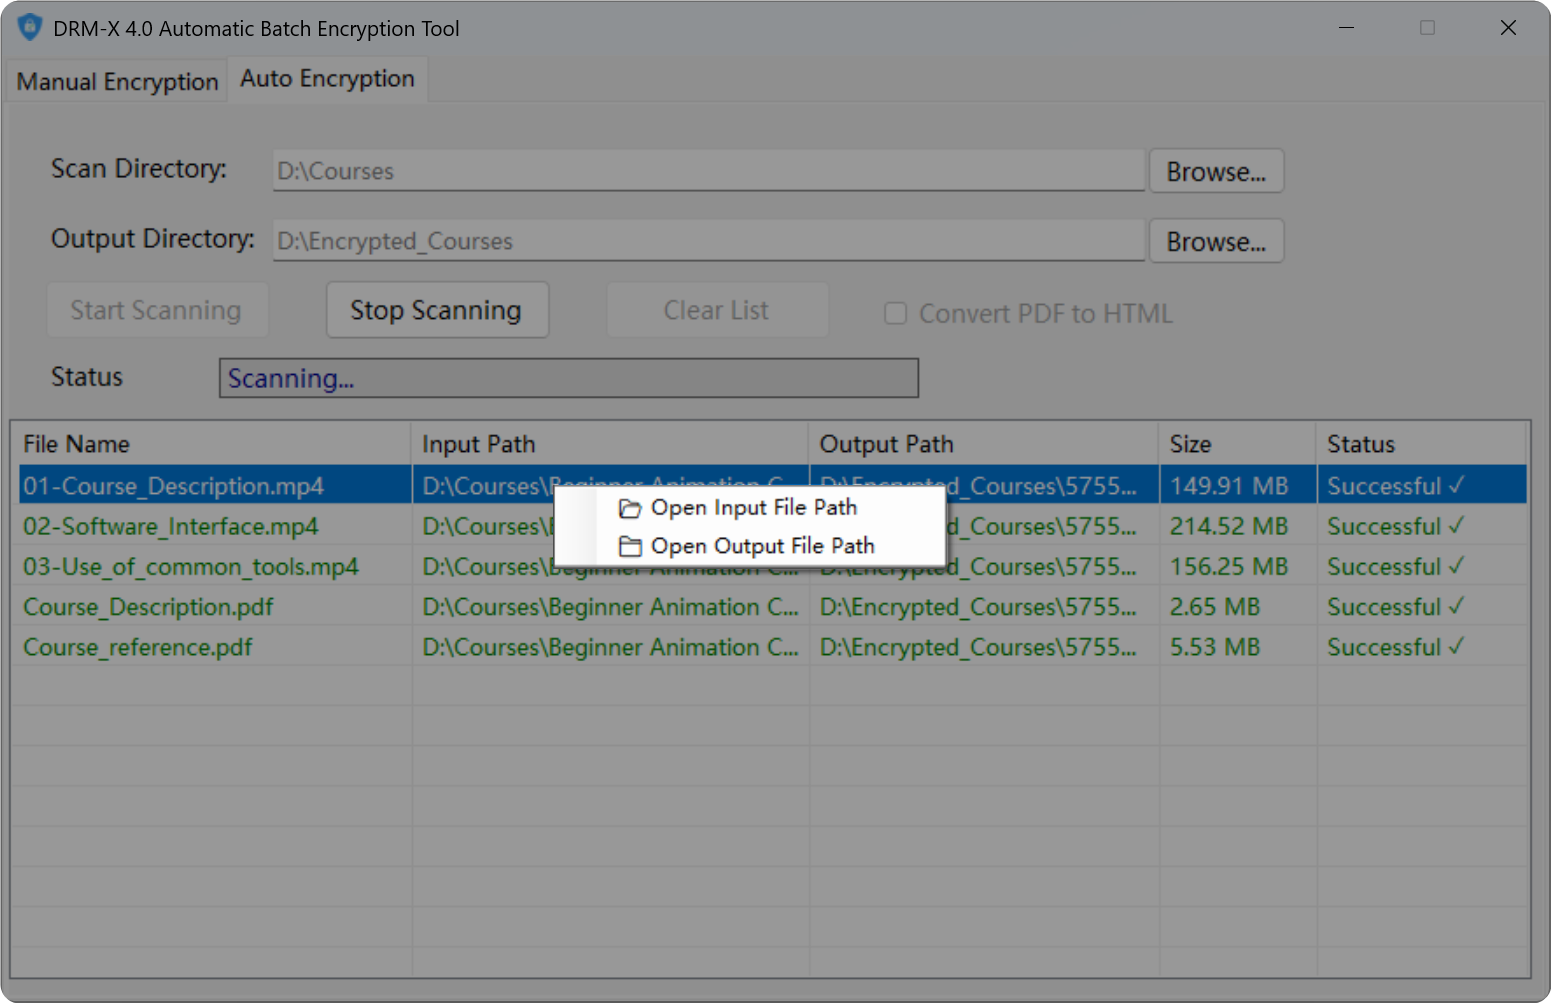
The file list of the Auto Encryption interface supports the right-click menu, and the functions include:
- Open Input File Path: Open the directory where the source file is located.
- Open Output File Path: Open the directory where the encrypted file is located.
License Profile creation mechanism
When the program scans the "first-level sub-directory" under the [Scan Directory], the automatic creation process of the License Profile will be triggered. Specifically, the program will use the folder name of the first-level sub-directory as the License Profile name and complete the creation of the License Profile in your DRM-X 4.0 account.
You can flexibly use the folder naming rules to cleverly set the course ID or product ID corresponding to your website in the folder name. In this way, not only can the License Profile be accurately associated with the actual website course, which is convenient for subsequent management and identification, but it can also further strengthen the classification management and encryption control of different file groups (corresponding to different courses or products) during the entire encryption process.
First-level subdirectory naming rules
The program will automatically split the folder names of the first-level subdirectories according to "_". For example, if a first-level folder such as [1320_Advanced Course] is scanned, the program will create a License Profile named "1320_Advanced Course" and set the "ProductID in your system" in the License Profile to 1320.
If the name of the first-level sub-directory is [Advanced Courses], that is, there is no "_" in the folder name for segmentation, the name of the License Profile created by the program will be "Advanced Courses", and the "ProductID in your system" in the License Profile will be set to 0 by default.
File processing records
This program uses the SQLite database to record the first-level subfolders (course folders) and files that are automatically scanned and processed, so as to avoid repeated encryption and repeated creation of License Profile. When the program completes the processing of folders or files, it will automatically generate a database file named "FileProcessLogDB.db" in the program directory.
You can use online SQLite visual management tools to view records in the database, such as [SQL Online IDE] https://sqliteonline.com .
The database contains the following two data tables:
Folder_License_Map: This table is used to record the complete path of the processed first-level directory, as well as the corresponding License Profile and Product ID information created. Through this table, you can clearly understand the association between each first-level directory and the License Profile and Product ID.
File_Process_Details: This table records the full path to each file encrypted by the program, as well as the License Profile ID used during the encryption process. This helps track the details of the encryption process for each file.
Usage scenarios
The automatic scanning and encryption function is applicable to the following two typical scenarios:
Mode 1: Manually organize the course folder structure
Before using the automatic scanning and encryption function, you need to manually organize the course folder to be encrypted and its internal file structure. The sample folder structure is as follows:
Courses(Set the scan directory)
└─ Basic-Courses
└─ 01-Course_Description.mp4
└─ 02-Software_interface.mp4
└─ 03-Use_common_tools.mp4
└─ Course_Description.pdf
└─ Course_Reference.pdf
└─ Advanced-Courses
└─ Videos
└─ Lesson_1.mp4
└─ Lesson_2.mp4
└─ document.pdf
After finishing the above folder structure, set the [Scan Directory] (that is, the path of the folder constructed above) and [Output Directory] (the designated path for storing encrypted files) in the [Auto Encryption] interface, and then click the [Start Scan] button. At this time, the program will automatically identify the top-level subfolders under the scan directory, and create corresponding License Profile in the DRM-X 4.0 account based on their names. In this example, the program will create 2 License Profile, named "Basic-Course" and "Advanced-Course". After encryption is completed, the output structure of the file is as follows:
Encrypted_Courses(Set the output directory)
└─ Basic-Courses
└─ 01-Course_Description_P.mp4
└─ 02-Software_interface_P.mp4
└─ 03-Use_common_tools_P.mp4
└─ Course_Description_P.pdf
└─ Course_Reference_P.pdf
└─ Advanced-Courses
└─ Videos
└─ Lesson_1_P.mp4
└─ Lesson_2_P.mp4
└─ document_P.pdf
⚠️Important Tips:
Operation process specifications: Do not manually create a new folder directly in the scan directory!!!
New content processing: If you need to add videos or subfolders to the "Basic-Courses" folder that has already been processed, you need to copy the newly added videos and subdirectories to the "Basic-Courses" directory. The program will automatically scan and encrypt the newly added video files and subdirectories.
Adding a new course: If you plan to add a new course directory, you need to organize the course file directory and files in advance, and then copy them to the set scan directory. In this way, the program can successfully identify and encrypt the new course videos and files during the next scan.
Strictly following the above operation process will help ensure the efficiency and accuracy of encryption. If you find that there are files that are missed, please click the [Stop Scan] button and click the [Start Scan] button again. The program will scan the directory again.
The second method: automatic encryption with course upload
If your website has a course management system, automatic scanning encryption can be used to automatically encrypt uploaded files after uploading.
🌟Instructions for use:
Start the "DRM-X 4.0 Auto-Encryption Tool" on the Windows server and switch to the [Auto Encryption] tab. Set the [Scan Directory] on this page. This directory should be the Upload directory of your website courses. Also set the [Output Directory]. We assume that this directory is the Encrypted_Courses directory at the same level as Upload. After the settings are completed, click the [Start Scanning] button.
When you create a course in the course management system, you will get the course ID and course name. At this time, you can create a folder named "CourseID_Course Name" in the Upload directory. For example, if the course ID is 105 and the course name is "Advanced Course", create a folder named "105_Advanced-Course".
When the scanning program detects the existence of a folder such as "105_Advanced-Course" in the Upload directory, it will automatically add a License Profile with the same name under your DRM-X 4.0 account, namely "105_Advanced-Course". At the same time, the program will set the "ProductID in your system" in the License Profile to 105, thereby linking the License Profile with your course.
After creating the License Profile, the program will also insert a record into the local SQLite database. The record contains information such as the course folder path, License Profile ID, License Profile Name, and Product ID (i.e. course ID).
When you upload a video file to the Videos folder in the course directory, or upload a PDF file to the PDF folder, the program will automatically create a corresponding folder in the output directory and encrypt the uploaded file. At the same time, the program will insert a record in the local database file to record the file information and related License Profile information in detail.
Example of scan structure:
Upload
└─ 105_Advanced-Courses
└─ Videos
└─ 01-Lesson 1.mp4
└─ 02-Lesson 2.mp4
└─ Reference Documentation.pdf
Sample output structure:
Encrypted_Courses
└─ 105_Advanced-Courses
└─ Videos
└─ 01-Lesson 1_P.mp4
└─ 02-Lesson 2_P.mp4
└─ Reference Documentation_P.pdf
Ask about Haihaisoft products, pricing, implementation, or anything else — our highly trained reps are standing by, ready to help.